Introduction 00:00
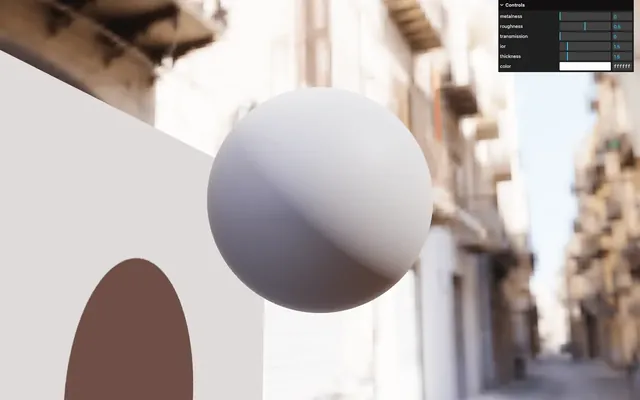
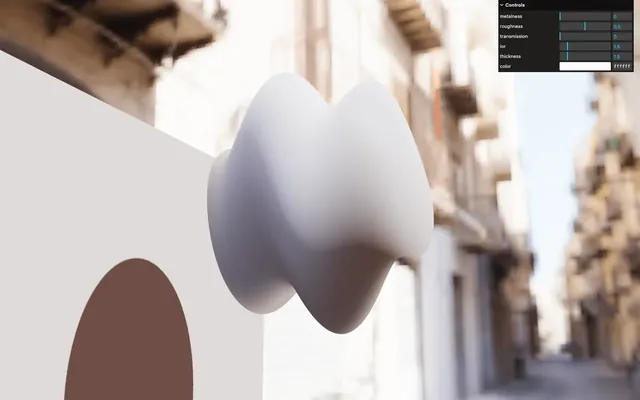
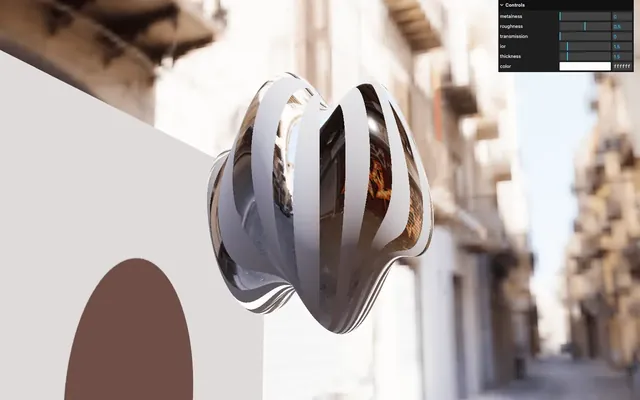
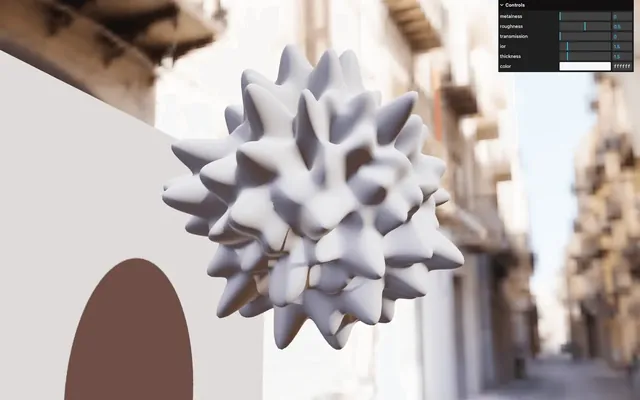
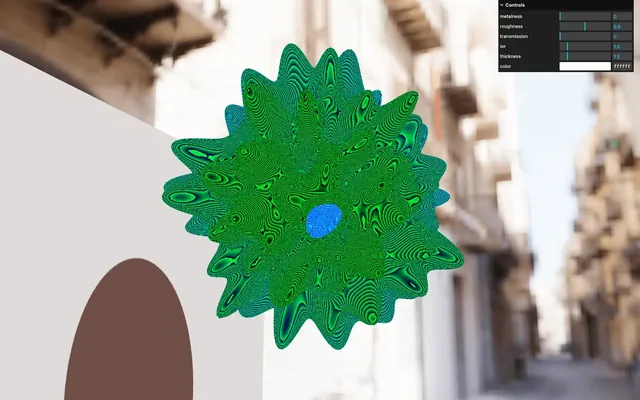
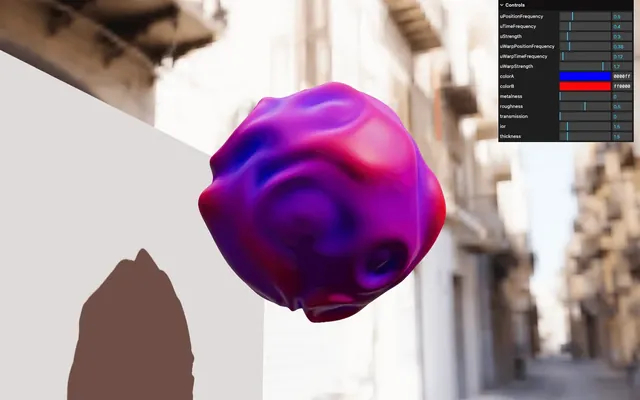
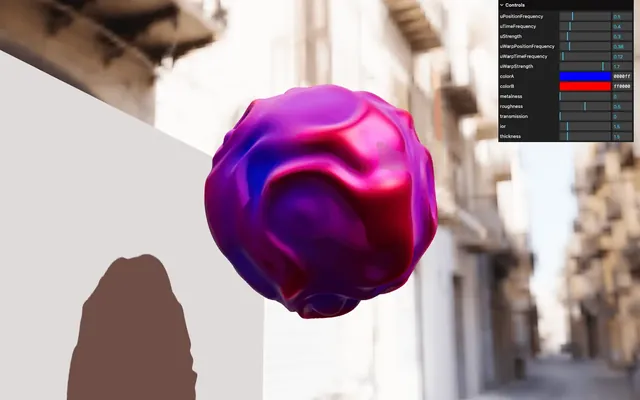
In this lesson, we are going to create a wobbly sphere:

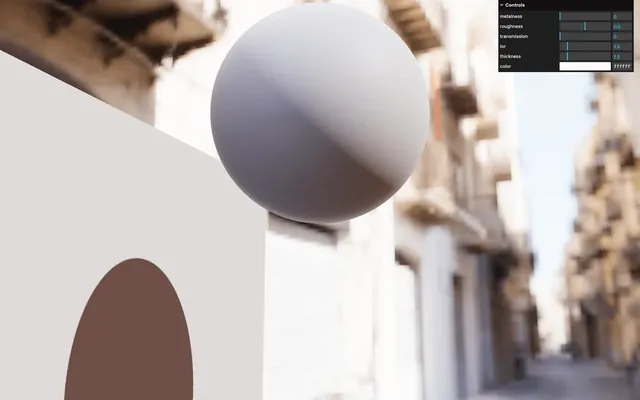
To create an animation that feels this organic, we need to animate the vertices in a vertex shader, but as you can see, all the properties of the MeshPhysicalMaterial are still supported.
We can play with the metalness, roughness, transmission, and IOR. Even the shadow is supported and it still looks just like a classic MeshPhysicalMaterial.
To make this possible we need to start from the built-in MeshPhysicalMaterial as we did in the Modified Material lesson, and improve it. But this time, we are going to use a different approach and rely on the Custom Shader Material library.
This library injects shader code directly in the Three.js built-in material, but without us having to dig into the Three.js shaders to understand where and how to inject the code, thus making it beginner-friendly.
Setup 02:10
The starter already contains the following:
- A IcosahedronGeometry sphere, a MeshPhysicalMaterial applied to it and a bunch of associated tweaks
- A plane to test the shadow
- An HDR environment map is used as background but also to light up the scene
- A DirectionalLight to light up the sphere even more and cast a shadow on the plane
- The
vite-plugin-glsldependency to handle GLSL files - A
shaders/folder with asimplexNoise4d.glslfile ready to be included - A
GLTFLoaderinstance with aDracoLoaderinstance associated with it so that we can test our wobbly animation on models - Suzanne model as
suzanne.glbin thestatic/folder OrbitControlsto rotate around
Custom Shader Material 03:33
For this effect, we are going to enhance the MeshPhysicalMaterial and make the surface wobble.
For now, we just want to implement Custom Shader Material and, later, we are going to create the wobble animation.
Dependency
Custom Shader Material is available on NPM: https://www.npmjs.com/package/three-custom-shader-material
Install the library using npm install and force the version to 5.4:
npm install three-custom-shader-material@5.4We force the version to make sure it works with the lesson.
In script.js, import CustomShaderMaterial from 'three-custom-shader-material/vanilla':
import CustomShaderMaterial from 'three-custom-shader-material/vanilla'vanilla indicates that it’s the classic implementation of the library without using any third-party library like React Three Fiber (which you’ll discover later in the course).
Using CustomShaderMaterial, we can create our new material based on a built-in material.
Replace the THREE.MeshPhysicalMaterial by CustomShaderMaterial and add the baseMaterial property to THREE.MeshPhysicalMaterial. Next, we are going to separate the Custom Shader Material and the base material properties using comments:
// Material
const material = new CustomShaderMaterial({
    // CSM
    baseMaterial: THREE.MeshPhysicalMaterial,

    // MeshPhysicalMaterial
    metalness: 0,
    roughness: 0.5,
    color: '#ffffff',
    transmission: 0,
    ior: 1.5,
    thickness: 1.5,
    transparent: true,
    wireframe: false
})
As you can see, the material is still working. Even though it’s now an instance of CustomShaderMaterial, it’s using THREE.MeshPhysicalMaterial as the base material and all previously supported properties are still working.
Inject custom shader
We now want to inject our own shader code and this is where Custom Shader Material comes in handy. Thanks to the library, we are going to add custom shaders just like we were writing normal vertex and fragment shaders.
In src/shaders/, create a wobble/ folder.
In there, create a vertex.glsl file with an empty main():
void main()
{

}
Still in src/shaders/wobble/, create a fragment.glsl with the same empty main():
void main()
{

}
In script.js, import both as wobbleVertexShader and wobbleFragmentShader:
import wobbleVertexShader from './shaders/wobble/vertex.glsl'
import wobbleFragmentShader from './shaders/wobble/fragment.glsl'
Add them to the CustomShaderMaterial using the vertexShader and the fragmentShader properties, similar to what we do for a ShaderMaterial:
// Material
const material = new CustomShaderMaterial({
    // CSM
    baseMaterial: THREE.MeshPhysicalMaterial,
    vertexShader: wobbleVertexShader,
    fragmentShader: wobbleFragmentShader,

    // MeshPhysicalMaterial
    // ...
})
Nothing happens, and that’s good news.
We have injected our own vertex and fragment shaders, but those are doing nothing, for now.
Warning
You might have noticed a warning in the console:
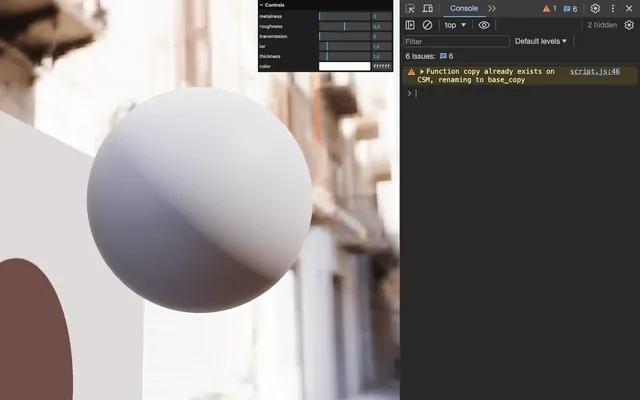
This is Custom Shader Material warning us about unexpected pieces of code that have been dealt with and that are harmless.
You can silence those warnings by adding the silent property to true:
// Material
const material = new CustomShaderMaterial({
    // CSM
    baseMaterial: THREE.MeshPhysicalMaterial,
    vertexShader: wobbleVertexShader,
    fragmentShader: wobbleFragmentShader,
    silent: true,

    // MeshPhysicalMaterial
    // ...
})
Variables
We now want to know how we update the built-in material.
To do that, we can use the Custom Shader Material variables that you can find in the documentation: https://github.com/FarazzShaikh/THREE-CustomShaderMaterial?tab=readme-ov-file#output-variables
Custom Shader Material created a bunch of variables like csm_Position, csm_Normal, csm_PointSize, csm_DiffuseColor, csm_Roughness and modifying those will modify the final output of the shader.
Let’s do some some tests.
In vertex.glsl, in the main() function, increase the csm_Position.y:
void main()
{
    csm_Position.y += 2.0;
}
The sphere is 2 units higher.
We can even use the current position to create fun shapes:
void main()
{
    csm_Position.y += sin(csm_Position.z * 3.0) * 0.5;
}
But what about the fragment.glsl?
We can change the final color using csm_FragColor. Change the rgb of csm_FragColor to a bright red:
void main()
{
    csm_FragColor.rgb = vec3(1.0, 0.5, 0.5);
}
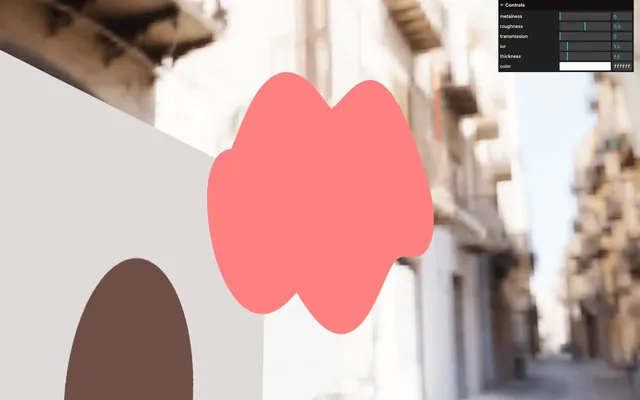
Nice, but we lose the shading.
Now for the good news: we can tweak the material color (before the light and shadow is applied) with csm_DiffuseColor.
Change the rgb of csm_DiffuseColor to pure red:
void main()
{
    csm_DiffuseColor.rgb = vec3(1.0, 0.0, 0.0);
}
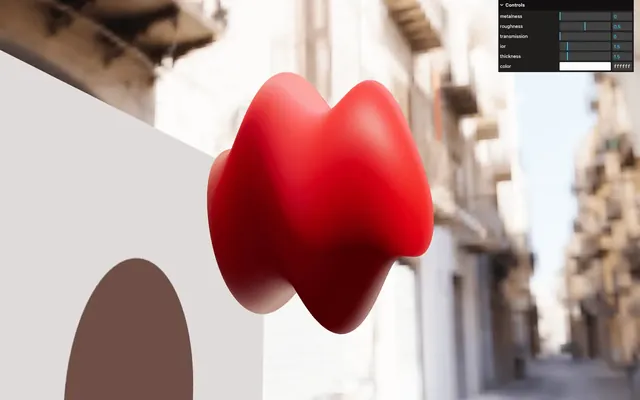
It’s like changing the color property. Not relevant, but at least we now know how it works.
Let’s have a bit more fun. We are going to play with the metalness and the roughness by updating csm_Metalness and the csm_Roughness in a vertical stripes pattern. Follow the code and it’ll make sense.
First, we need the UV coordinates in the fragment shader.
Just like we used to do, in vertex.glsl, create a vec2 vUv varying and assign it the uv:
varying vec2 vUv;

void main()
{
    // ...

    // Varying
    vUv = uv;
}
In fragment.glsl retrieve it:
varying vec2 vUv;

void main()
{
    // ...
}
Update the csm_Metalness with a sin and a step on the vUv.x multiplied by 100.0:
void main()
{
    csm_Metalness = step(0.0, sin(vUv.x * 100.0));
}

Set the csm_Roughness to the inverse by subtracting csm_Metalness to 1.0:
void main()
{
    csm_Metalness = step(0.0, sin(vUv.x * 100.0));
    csm_Roughness = 1.0 - csm_Metalness;
}
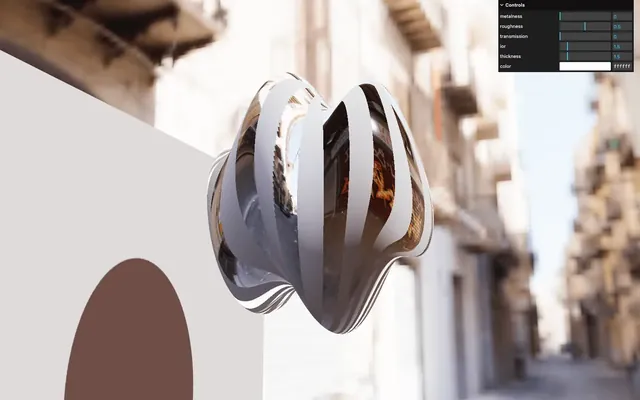
And if you don’t like the weird stair effect in the pattern, add 0.5 to what’s in the sin:
void main()
{
    csm_Metalness = step(0.0, sin(vUv.x * 100.0 + 0.5));
    csm_Roughness = 1.0 - csm_Metalness;
}
And that’s how powerful Custom Shader Material is.
But that’s not the effect we want to achieve.
Remove the vUv and empty both main() functions:
void main()
{
}
Basic wobble 18:58
Let’s start with the wobble effect.
Theory
The process is similar to what we did in the Raging Sea Shading lessons. We calculate an elevation according to the vertex position and we move that vertex.
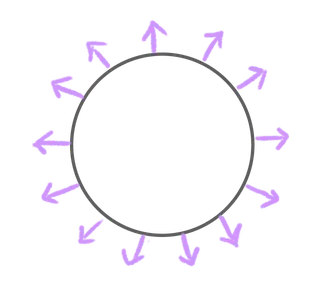
For the Raging Sea, we could make the vertices go up and down using the y-axis. But in this case, it’s not that simple. We want to make the vertices move forward and backwards according to the face orientation.
The good news is that we already know a variable indicating what’s the direction of the face, and it’s the normal:
Implementation
We are going to use the now well-known Simplex Noise which is already available in the src/shaders/includes/ folder as simplexNoise4d.
It’s a 4D Simplex Noise so we can use the 3D position as the base input and use the fourth dimension to make it vary in time.
Include it in vertex.glsl:
#include ../includes/simplexNoise4d.glsl

void main()
{
}
Call simplexNoise4d(), send it a vec4() and save it as a float wobble (don’t save):
void main()
{
    // Wobble
    float wobble = simplexNoise4d(vec4());
}
To that vec4, we are going to send the position as the first three values and we can get that position using csm_Position. For the fourth value, we set it to 0.0, and we are going to replace it with the time later:
void main()
{
    // Wobble
    float wobble = simplexNoise4d(vec4(
        csm_Position, // XYZ
        0.0           // W
    ));
}
Finally, we want to make the vertex move according to the normal and it’s as simple as multiplying wobble by normal and adding it to csm_Position:
void main()
{
// Wobble
float wobble = simplexNoise4d(vec4(
csm_Position, // XYZ
0.0 // W
));
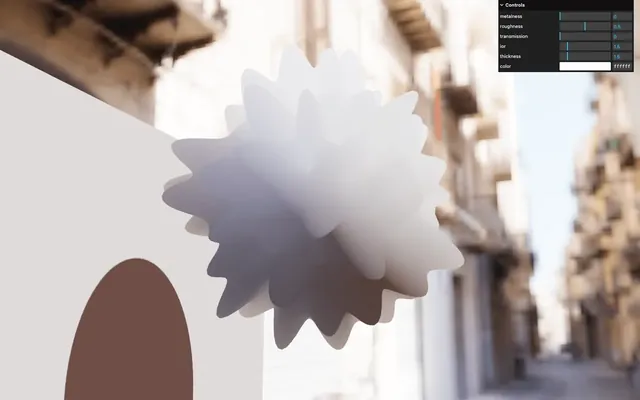
csm_Position += wobble * normal;
}
Compute the normals 22:08
It seems to be working, but the shading looks weird. It’s as if the faces aren’t orientated properly, and it’s exactly the issue we had when adding shading to the Raging Sea.
We can’t rely on the base normal anymore, so we need to compute them and use the neighbours technique.
In the case of the Raging Sea, we were able to calculate where the neighbours were quite easily because it was a flat grid:

But things are a little more complicated here. Since it’s a sphere, we could try to find the neighbours using fancy trigonometry, but we want our wobble effect to work, even with imported models.
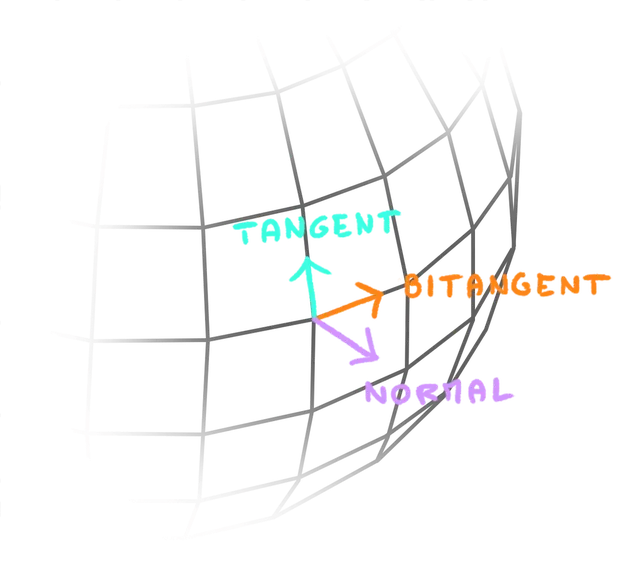
Fortunately, when it comes to 3D geometries, the two vectors going toward the neighbours we are looking for are well known. It’s the “tangent” and the “bitangent”:
For now, we are going to focus on the tangent only and check the bitangent later.
Tangent
Three.js can help us with the tangent by creating an attribute just for it so that we can access it in the vertex shader. Sounds too good to be true? Let’s try it.
In script.js, after instantiating the IcosahedronGeometry, console.log() the geometry.attributes to see if we already have this tangent attribute:
const geometry = new THREE.IcosahedronGeometry(2.5, 50)
console.log(geometry.attributes)
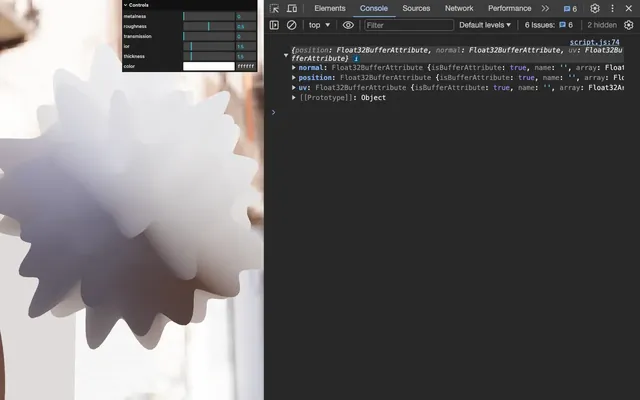
We get the normal, the position and the uv, but no tangent.
If you check the BufferGeometry documentation (which IcosahedronGeometry inherited from), there is a computeTangents() method.
Let’s try it:
const geometry = new THREE.IcosahedronGeometry(2.5, 50)
geometry.computeTangents()
console.log(geometry.attributes)
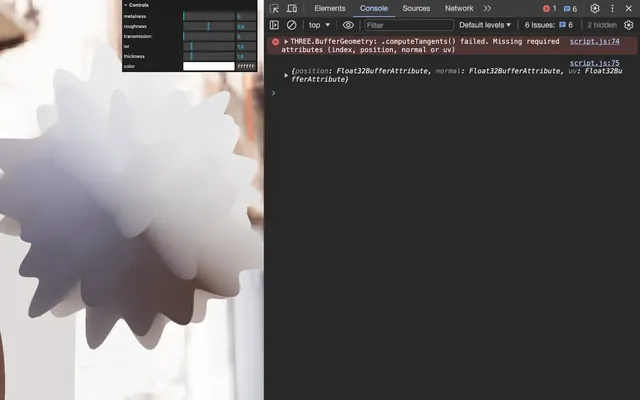
We get an error.
To calculate the tangent, Three.js needs the following attributes on the geometry: index, position, normal and uv.
We are missing the index, and this refers to the same index that we mentioned in previous lessons. It’s the index that enables re-using the same vertices for multiple triangles:
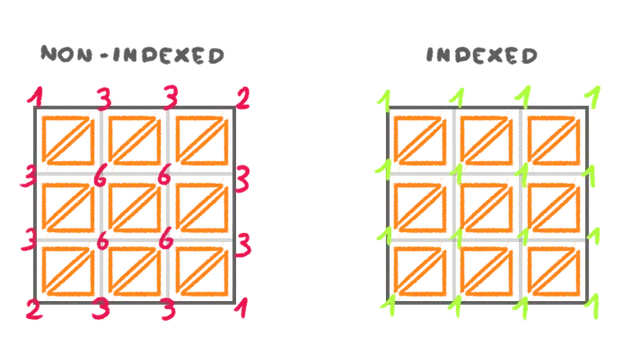
This means that we need to convert our non-indexed geometry to an indexed geometry and we can do that thanks to a special Three.js class named BufferGeometryUtils.
This class provides a bunch of functions and we don’t need to instantiate it to use those functions. Instead, we can import the functions that we need only. And the function that will convert our geometry to an indexed geometry is mergeVertices.
Import mergeVertices from 'three/addons/utils/BufferGeometryUtils.js':
import { mergeVertices } from 'three/addons/utils/BufferGeometryUtils.js'Now replace the const of geometry by a let because we want to replace the variable, call mergeVertices() on geometry and replace it:
let geometry = new THREE.IcosahedronGeometry(2.5, 50)
geometry = mergeVertices(geometry)
geometry.computeTangents()
console.log(geometry.attributes)
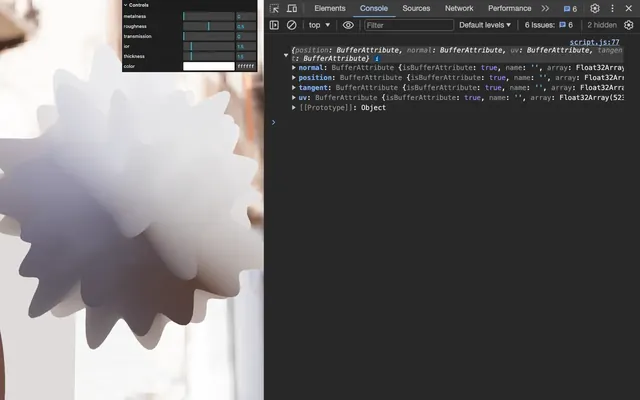
We now have a brand new tangent attribute.
Be careful, merging the vertices to generate an indexed geometry can be power-consuming. Even worse, the time it takes to do it increases exponentially with the amount of vertices. Fortunately, we do it only at the start of the experience, so keep an eye on the long freeze at the start of the experience.
Also, note that imported models can have already indexed geometries, which is the case of the model we are going to use later.
Remove the console.log():
let geometry = new THREE.IcosahedronGeometry(2.5, 50)
geometry = mergeVertices(geometry)
geometry.computeTangents()
Bitangent
We have the normal, we have the tangent, and we now need the bitangent.
Can you guess how to find it? Here’s a clue, the bitangent is perpendicular to both the normal and the tangent.
We are going to use the cross product!

In vertex.glsl, retrieve the tangent attribute. Be careful, it’s a vec4:
attribute vec4 tangent;The normal attribute is already injected in the shader.
At the beginning of the main() function, calculate the cross product of normal with tangent.xyz using cross and save it as a vec3 biTangent variable:
void main()
{
    vec3 biTangent = cross(normal, tangent.xyz);

    // ...
}
And that’s all. We now have the tangent and the biTangent that we can use to calculate where the two neighbours are.
Compute the normal
To compute the normal, we first need to determine the two neighbours that we are going to name A and B:
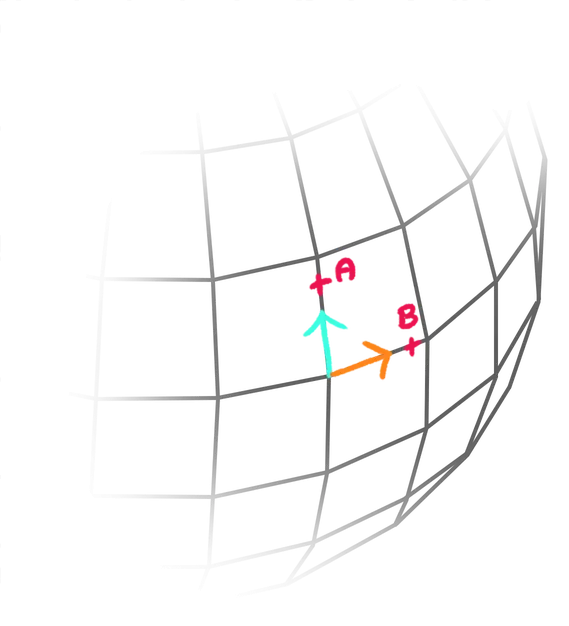
A is on the tangent side and B is on the biTangent side.
First, let’s define the distance toward those neighbours as a float shift variable:
void main()
{
    vec3 biTangent = cross(normal, tangent.xyz);

    // Neighbours positions
    float shift = 0.01;

    // ...
}
Now we can create a positionA and positionB based on the csm_Position and add the tangent and biTangent respectively, multiplied by shift:
void main()
{
    // ...

    // Neighbours positions
    float shift = 0.01;
    vec3 positionA = csm_Position + tangent.xyz * shift;
    vec3 positionB = csm_Position + biTangent * shift;

    // ...
}
Since we are going to apply the simplexNoise4d three times, let’s put it in a separate function.
Before main(), create getWobble function returning a float (don’t save):
float getWobble()
{

}

void main()
{
    // ...
}
Return the same simplexNoise4d (don’t save):
float getWobble()
{
    return simplexNoise4d(vec4(
        csm_Position, // XYZ
        0.0           // W
    ));
}
Add a vec3 position parameter and replace csm_Position with it (you can save):
float getWobble(vec3 position)
{
    return simplexNoise4d(vec4(
        position, // XYZ
        0.0       // W
    ));
}
Replace the simplexNoise4d in the main() with a call to getWobble():
void main()
{
    // ...

    // Wobble
    float wobble = getWobble(csm_Position);
    csm_Position += wobble * normal;
}
We can now use the same getWobble() to update the positionA and positionB:
void main()
{
    // ...

    // Wobble
    float wobble = getWobble(csm_Position);
    csm_Position += wobble * normal;
    positionA    += getWobble(positionA) * normal;
    positionB    += getWobble(positionB) * normal;
}
We have the current vertex position as csm_Position, we have the two neighbours as positionA and positionB. We now need the directions from the current vertex to the neighbours and we are going to call them toA and toB.
To calculate a direction from one vec3 to the other, we subtract the destination from the origin.
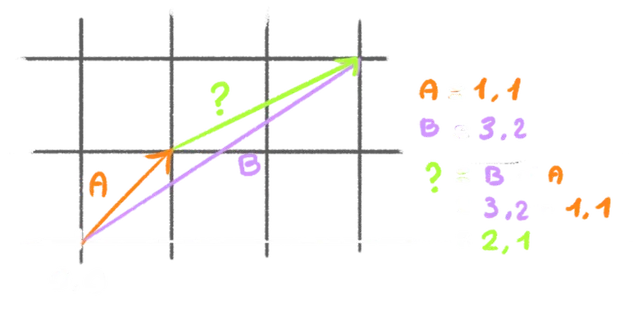
And since we just want the direction, we normalize it using normalize:
void main()
{
    // ...

    // Compute normal
    vec3 toA = normalize(positionA - csm_Position);
    vec3 toB = normalize(positionB - csm_Position);
}
Finally, we can calculate the cross product of the two:
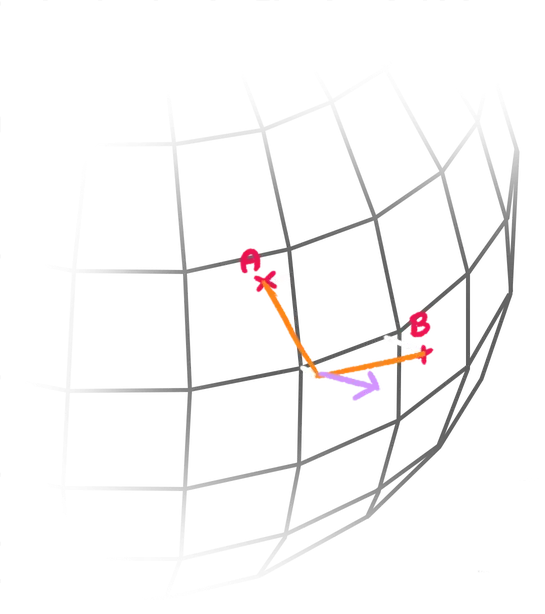
Call cross of toA with toB and save it as csm_Normal to override the default normal:
void main()
{
    // ...

    // Compute normal
    vec3 toA = normalize(positionA - csm_Position);
    vec3 toB = normalize(positionB - csm_Position);
    csm_Normal = cross(toA, toB);
}
We get the right normals.
Fix the shadow 42:29
Before animating and improving the wobble effect, we need to fix the shadow.
You can see that something is wrong on the plane, but also on the mesh itself:
If you remember from the previous lessons, to handle the shadows, Three.js renders the scene seen from the light in an off-screen texture with all the materials replaced by a MeshDepthMaterial. Using that render, Three.js determines if the surface is in the shade or not.
But the wobble effect isn’t applied on the default MeshDepthMaterial.
We need to provide our own MeshDepthMaterial supporting the wobble, and we can do that by enhancing the MeshDepthMaterial thanks to Custom Shader Material, to which we assign the customDepthMaterial property of the Mesh.
First, let’s create the depth material.
Duplicate the material, name it depthMaterial and set its baseMaterial to THREE.MeshDepthMaterial:
const depthMaterial = new CustomShaderMaterial({
    // CSM
    baseMaterial: THREE.MeshDepthMaterial,
    vertexShader: wobbleVertexShader,
    fragmentShader: wobbleFragmentShader,
    silent: true,

    // ...
})
Remove all the properties associated with MeshPhysicalMaterial and add a property named depthPacking to THREE.RGBADepthPacking:
const depthMaterial = new CustomShaderMaterial({
    // CSM
    baseMaterial: THREE.MeshDepthMaterial,
    vertexShader: wobbleVertexShader,
    fragmentShader: wobbleFragmentShader,
    silent: true,

    // MeshDepthMaterial
    depthPacking: THREE.RGBADepthPacking
})
The depthPacking is an algorithm used by Three.js to encode the depth in all 4 channels instead of a grayscale depth, which improves the precision.
Since we don’t want to change the fragment shader, remove the fragmentShader property:
const depthMaterial = new CustomShaderMaterial({
    // CSM
    baseMaterial: THREE.MeshDepthMaterial,
    vertexShader: wobbleVertexShader,
    silent: true,

    // MeshDepthMaterial
    depthPacking: THREE.RGBADepthPacking
})
If you are curious what the depth material looks like, set it on the Mesh:
const wobble = new THREE.Mesh(geometry, depthMaterial)
Put back the material:
const wobble = new THREE.Mesh(geometry, material)
Assign the depthMaterial to the customDepthMaterial property of wobble:
const wobble = new THREE.Mesh(geometry, material)
wobble.customDepthMaterial = depthMaterial
Our shadow is fixed.
Animate and control the wobbling 48:33
We are going to use uniforms to animate and control the wobbling. In addition, we are going to create 4 uniforms at once:
uTimeto make the effect vary in timeuPositionFrequencyto control the spatial frequencyuTimeFrequencyto control the time frequencyuStrengthto control the strength of the wobble
Since those uniforms affect both the material and the depthMaterial, we are going to create them only once and use them on both materials.
Before the materials, create a uniforms object with the following properties using the Uniform class:
// Material
const uniforms = {
    uTime: new THREE.Uniform(0),
    uPositionFrequency: new THREE.Uniform(0.5),
    uTimeFrequency: new THREE.Uniform(0.4),
    uStrength: new THREE.Uniform(0.3),
}

const material = new CustomShaderMaterial({
    // ...
})

const depthMaterial = new CustomShaderMaterial({
    // ...
})
Send uniforms to the uniforms properties of both materials:
const material = new CustomShaderMaterial({
    // ...
    uniforms: uniforms,
    // ...
})

const depthMaterial = new CustomShaderMaterial({
    // ...
    uniforms: uniforms,
    // ...
})
Add tweaks to the uPositionFrequency, uTimeFrequency and uStrength with a min value of 0, a max of 2 and a step of 0.001:
// Tweaks
gui.add(uniforms.uPositionFrequency, 'value', 0, 2, 0.001).name('uPositionFrequency')
gui.add(uniforms.uTimeFrequency, 'value', 0, 2, 0.001).name('uTimeFrequency')
gui.add(uniforms.uStrength, 'value', 0, 2, 0.001).name('uStrength')
// ...
In the tick function, update the uTime.value using elapsedTime:
const tick = () =>
{
    const elapsedTime = clock.getElapsedTime()

    // Materials
    uniforms.uTime.value = elapsedTime

    // ...
}
In vertex.glsl, retrieve all 4 uniforms:
uniform float uTime;
uniform float uPositionFrequency;
uniform float uTimeFrequency;
uniform float uStrength;
Now let’s apply them on the simplexNoise4d().
Multiply position by uPositionFrequency:
float getWobble(vec3 position)
{
    return simplexNoise4d(vec4(
        position * uPositionFrequency, // XYZ
        0.0                            // W
    ));
}
Multiply the whole simplexNoise4d() by uStrength:
float getWobble(vec3 position)
{
    return simplexNoise4d(vec4(
        position * uPositionFrequency, // XYZ
        0.0                            // W
    )) * uStrength;
}
Replace the fourth value of the vec4 (currently 0.0) by uTime multiplied by uTimeFrequency:
float getWobble(vec3 position)
{
    return simplexNoise4d(vec4(
        position * uPositionFrequency, // XYZ
        uTime * uTimeFrequency         // W
    )) * uStrength;
}
Warp 54:42
The effect looks nice, but too regular.
We could combine multiple Simplex Noise with various frequencies, but that would look more like waves. Instead, we are going to warp the position we send to the Simplex Noise.
If you are a Warhammer 40k fan, don’t be afraid, it’s not this kind of warp.
The idea is that we are going to apply a Simplex Noise on the position we send to the Simplex Noise. It’s a Simplex Noise-ception.
In the getWobble function, create a vec3 warpedPosition based on the position and send it to the simplexNoise4d() instead of position:
float getWobble(vec3 position)
{
    vec3 warpedPosition = position;

    return simplexNoise4d(vec4(
        warpedPosition * uPositionFrequency, // XYZ
        // ...
    )) * uStrength;
}
Now add another simplexNoise4d to the warpedPosition, use the position as the first 3 values of the vec4 and uTime as the fourth value:
float getWobble(vec3 position)
{
    vec3 warpedPosition = position;
    warpedPosition += simplexNoise4d(vec4(
        position,
        uTime
    ));

    // ...
}
That’s the effect we want, but we need to tweak it. Since the parameters are similar to the ones we used for the initial simplexNoise4d(), let’s add the uniforms and the associated tweaks again.
Back to script.js, add the following uWarpPositionFrequency, uWarpTimeFrequency and uWarpStrength uniforms to the uniforms object:
const uniforms = {
    // ...
    uWarpPositionFrequency: new THREE.Uniform(0.38),
    uWarpTimeFrequency: new THREE.Uniform(0.12),
    uWarpStrength: new THREE.Uniform(1.7),
}
Add the corresponding tweaks with a min value of 0, a max of 2 and a step of 0.001:
// Tweaks
// ...
gui.add(uniforms.uWarpPositionFrequency, 'value', 0, 2, 0.001).name('uWarpPositionFrequency')
gui.add(uniforms.uWarpTimeFrequency, 'value', 0, 2, 0.001).name('uWarpTimeFrequency')
gui.add(uniforms.uWarpStrength, 'value', 0, 2, 0.001).name('uWarpStrength')
// ...
In vertex.glsl, retrieve the three uniforms:
uniform float uWarpPositionFrequency;
uniform float uWarpTimeFrequency;
uniform float uWarpStrength;
Apply them to the simplexNoise4d() associated with warpedPosition:
float getWobble(vec3 position)
{
    vec3 warpedPosition = position;
    warpedPosition += simplexNoise4d(
        vec4(
            position * uWarpPositionFrequency,
            uTime * uWarpTimeFrequency
        )
    ) * uWarpStrength;

    // ...
}
The best part is that we can still play with the MeshPhysicalMaterial properties:
Fragment 59:46
We are done with the wobble effect, but let’s have a bit more fun and play with the fragment shader and make the color vary according to the wobble.
Color mix
Since we are going to create a fragment that varies with the wobble, we first need to send it from the vertex to the fragment.
In vertex.glsl, create a float vWobble varying and assign it wobble:
varying float vWobble;

// ...

void main()
{
    // ...

    // Varying
    vWobble = wobble;
}
In fragment.glsl retrieve the float vWobble:
varying float vWobble;Out of curiosity, we want to see what’s in vWobble. In a classic ShaderMaterial we would have sent it to the gl_FragColor to see the visual result. Thanks to Custom Shader Material, we can do it with the csm_FragColor variable.
Assign a vec3() of vWobble to the rgb of csm_FragColor:
void main()
{
    csm_FragColor.rgb = vec3(vWobble);
}
It’s working, but the contrast isn’t very high, like if the vWobble is far from reaching 1 even though the Simplex Noise outputs a number ranging from -1 to +1.
The reason is that we apply the uStrength on the simplexNoise4d() and, currently, uStrength is quite low.
To fix that, in vertex.glsl, put back the original range of the simplexNoise4d() by dividing wobble by uStrength when assigning it to vWobble:
void main()
{
    // ...

    // Varying
    vWobble = wobble / uStrength;
}
Now that we are happy with vWobble, in fragment.glsl, remove the csm_FragColor:
void main()
{
}
This is where you are free to do whatever you want. You can draw shapes, play with the roughness, play with the metalness, have the color vary, etc.
In our case, we are going to mix two colors according to the wobble. First, we need to send the two colors as uniforms and we are going to make them tweakable.
In script.js, before the uniforms, add a colorA and colorB to debugObject:
debugObject.colorA = '#0000ff'
debugObject.colorB = '#ff0000'

const uniforms = {
    // ...
}
Add them to the uniforms as uColorA and uColorB using the Uniform class and the Color class:
const uniforms = {
    // ...
    uColorA: new THREE.Uniform(new THREE.Color(debugObject.colorA)),
    uColorB: new THREE.Uniform(new THREE.Color(debugObject.colorB))
}
This means that we are sending those color uniforms to the depth material too. It’s useless, but it won’t create any error, so let’s keep it like that for the sake of simplification.
Remove the 'color' tweak and replace it with uColorA and uColorB tweaks using addColor():
// Tweaks
// ...
gui.addColor(debugObject, 'colorA').onChange(() => uniforms.uColorA.value.set(debugObject.colorA))
gui.addColor(debugObject, 'colorB').onChange(() => uniforms.uColorB.value.set(debugObject.colorB))
// ...
In fragment.glsl, retrieve the uColorA and uColorB uniforms as vec3:
uniform vec3 uColorA;
uniform vec3 uColorB;
In main(), create a float colorMix variable by remapping vWobble so that it goes from 0 to 1 instead of -1 to +1 and use a smoothstep to smooth the value:
void main()
{
    float colorMix = smoothstep(- 1.0, 1.0, vWobble);
}
Use colorMix as the factor of mix to mix between uColorA and uColorB. Save it as csm_DiffuseColor:
void main()
{
    float colorMix = smoothstep(- 1.0, 1.0, vWobble);
    csm_DiffuseColor.rgb = mix(uColorA, uColorB, colorMix);
}
Reflective tip
It’s great, but it can be even better.
Remember the metalness/roughness trick we used at the beginning? Let’s use the same technique to make the tip of the wobble reflective.
Use a step with a threshold of 0.25 on vWobble and assign it to csm_Metalness:
void main()
{
    // ...

    // Mirror step
    csm_Metalness = step(0.25, vWobble);
}
Set the csm_Roughness to the opposite by subtracting the csm_Metalness to 1.0:
void main()
{
    // ...

    // Mirror step
    csm_Metalness = step(0.25, vWobble);
    csm_Roughness = 1.0 - csm_Metalness;
}
Shinny tip
Although this effect is nice, let’s comment it and try something more subtle.
void main()
{
    float colorMix = smoothstep(- 1.0, 1.0, vWobble);
    csm_DiffuseColor.rgb = mix(uColorA, uColorB, colorMix);

    // // Mirror step
    // csm_Metalness = step(0.25, vWobble);
    // csm_Roughness = 1.0 - csm_Metalness;
}
We want to make the tip of the wobble shinier by reducing the roughness.
To do that, subtract colorMix from 1.0 and assign it to csm_Roughness:
void main()
{
    // ...

    // Shinny tip
    csm_Roughness = 1.0 - colorMix;
}
It’s getting weird, so we are going to stop there. However, feel free to experiment.
Model 01:11:33
It’s working with a sphere, but does it work with any shape?
The usual Suzanne model is provided in the static/ folder as suzanne.glb.
The model is quite simple. It’s a subdivided and smoothed version of the default Suzanne we get from Blender:

In script.js, comment the Geometry and Mesh parts:
// // Geometry
// let geometry = new THREE.IcosahedronGeometry(2.5, 50)
// geometry = mergeVertices(geometry)
// geometry.computeTangents()

// // Mesh
// const wobble = new THREE.Mesh(geometry, material)
// wobble.customDepthMaterial = depthMaterial
// wobble.receiveShadow = true
// wobble.castShadow = true
// scene.add(wobble)
Using the GLTFLoader instance, load the model:
// Model
gltfLoader.load('./suzanne.glb', (gltf) =>
{

})
Retrieve the first child of the gltf.scene and assign it to a wobble variable:
gltfLoader.load('./suzanne.glb', (gltf) =>
{
    const wobble = gltf.scene.children[0]
})
Set it up like the previous wobble Mesh and add() it to the scene:
gltfLoader.load('./suzanne.glb', (gltf) =>
{
    const wobble = gltf.scene.children[0]
    wobble.receiveShadow = true
    wobble.castShadow = true
    wobble.material = material
    wobble.customDepthMaterial = depthMaterial

    scene.add(wobble)
})
It’s alive!
Going further 01:15:25
Custom Shader Material makes modifying built-in materials trivial and allows us to focus on the effect more than the technique.
Feel free to go further. Here are some suggestions:
- Improve the fragment shader and try new effects
- Use your own model
- Apply this knowledge to the Raging Sea in order to use MeshPhysicalMaterial
- Add sound and make the wobble react according to the volume and frequency of that sound